A Walk Through the VIF Application
Prerequisites
We assume you have installed the application's quickstart version listening on port 8080 (see Installation Quickstart).
Preparation
You have to configure a mail server, which the application can use to send mails to the users. If you're testing standalone on a Windows platform, you can install James from the Apache Jakarta project for example.
It's a good idea to create one or two mail accounts on this mail host, e.g. using the Mozilla mail client. In this example I'll use the mail accounts test1@my.host.org and test2@my.host.org (if you're testing standalone, you might create test1@localhost and test2@localhost).
Having done this you can start the VIF Quickstart intallation by double clicking the executable jar file vif-quickstart-8080.jar. This will fire up the browser under http://localhost:8080/admin and start the initial configuration wizard. This wizard will guide you to the DB creation process and create the super user entry.
You're ready now for a walk through the VIF application.
Creating new members
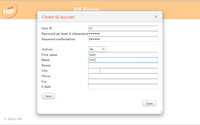
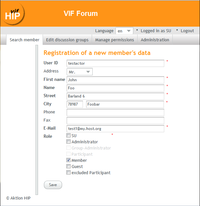
Log into the admin application with your super user account. Go to Search member -> Create member entry to create four member entries for testing purpose. Name the first one testactor and assign the mail address test1@my.host.org to this entry. Name the other three member entries groupAdmin1, groupAdmin2 and participant. Assign the mail address test2@my.host.org to these entries.
You have to check the Member role while creating the member entries.
If you have your mail client started, you will notice that the application sends mail to the mail accounts assigned, telling the members about the created accounts and giving them the information needed (i.e. user id and password) to login.
Creating a new discussion group
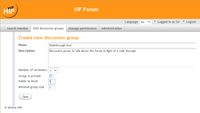
Create a new discussion group with Edit discussion groups -> Create group.
Name this group e.g. 'Walkthrough test' and add a suitable description. Set the 'Number of reviewers' to 1, 'Public to level' to 5, and the 'Minimal group size' to 3.
With the number of reviewers you define the workflow. The number of reviewers set to zero means that an author can immediately publish the contributions she creates. If this value is set > 0, the author is not able to publish. Instead, reviewers have to check the content of the contribution and only after the last reviewer agrees, the contribution can be published.
The value 'Public to level' tells the system how accessible the discussion group is for guest users (i.e. unauthorized users). With the minimal group size you can define when the discussion group is ready to start, i.e. when it is open for contributions.
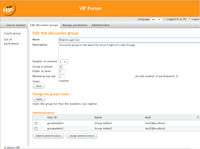
After having entered this data you have to assign the group administrators. To do this, click on Assign administrators to display the list of available members. Select groupAdmin1 and groupAdmin2. With that, you have successfully created the first discussion group.
Set new password
Login to the forum application as groupAdmin1 with the password created and sent to test2@my.host.org. Go to Personal data and then to Change password. Enter the old password and then a new password you can remember better. Confirm the new password and save the input.
Do the same with groupAdmin2, participant and testactor.
Create starting questions
Login to the admin application as groupAdmin1. You'll notice that you'll have fewer features available then you had as super user. However, as group administrator you're able to edit and administer the discussion groups you're assigned to.
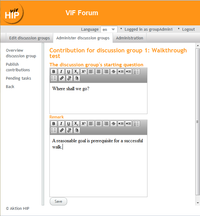
To enter the starting questions for your discussion group, select the discussion group Walkthrough test on the administration view. You'll see two fields displayed, one for the question and the other for additional remarks.
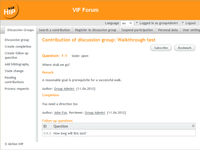
Enter a question, e.g. 'Where shall we go?' and 'A reasonable goal is prerequisite for a successful walk.' and save the data.
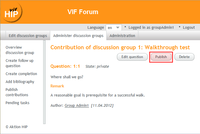
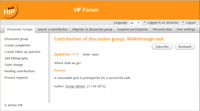
After the first question has been saved, you'll see the question listed with private state. At this point, only you as groupAdmin1 are able to see this question. However, by clicking on Publish contributions you can publish this starting question and thus make it open to the public. Therefore, the state of the question is 'open' now.
You may have noticed that a group administrator can publish her contributions immediately, i.e. without review.
Open the discussion group
After creating the starting question, you have to open your discussion group for that the members of the discussion forum can register for the group. Up till now your discussion group is visible only for the group's administrators, but not for forum members. To change this, click on Edit discussion groups and select the discussion group Walkthrough test from the list displayed. Then click on the Open button to make the discussion group visible in the forum.
Register for the discussion group
Login to the forum application as participant and register this member for Walkthrough test by clicking on Register to a discussion group and selecting the group. Do the same action to register the user testactor.
Now that the number of participants of this discussion group has exceeded the threshold, i.e. the minimal group size defined above, the discussion group is automatically activated. A notification is sent to all participants of the group. Each participant can now enter completions and follow up questions.
Create follow-up questions and completions
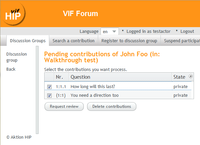
Login to the forum application as testactor and click on Walkthrough test in Discussion groups. A list of questions, actually consisting of the starting question only, will be displayed. Click on the starting question and you see a menu with various functions displayed. Click on Create completion to create a completion. Enter a comment in the field displayed, e.g. 'You need a direction too'. After saving the input, the starting question is displayed again. You'll notice no changes so far. This is because of the workflow. The author's contribution is not yet published. However, you can click on the menu item Pending contributions and you'll find there the completion created before.
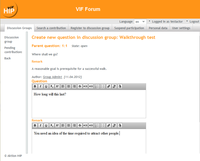
But we add a follow-up question first. To do this, click on Create follow up question to display the entry fields for the follow up question. In the question field enter e.g. 'How long will this last?' and in the additional field for remarks enter 'You need an idea of the time required to attract other people.'.
After saving your input you'll notice again that nothing has changed. Clicking on Pending contributions you'll find your second contribution.
You can login as participant to check that your contributions are not published and thus not readable by other users.
Request publication of the contributions
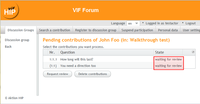
To publish your contributions you have to let them reviewed. To do that, click on the Pending contributions menu item and select the contributions you've created. Note that the state of the contributions is still 'private'. After clicking on the Request review button, the checkboxes disappear and the state changes to 'waiting for review'.
In the background, the system choses a reviewer by chance out of the participants registered for this group. A mail is sent to the appointed reviewer to inform her about the new review task. A copy of this mail is sent to author's mailbox.
You can check the two mailboxes to read the mails created by the system.
Review the contributions
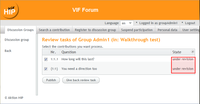
To carry out the review task, you have to login as reviewer. Check which participant (groupAdmin1, groupAdmin2 or participant) has been selected. Then login to the forum application with this user account, click on the discussion group Walkthrough test and then on Process requests. As designated reviewer you can accept the review task or refuse it. For this time, we accept the task. Select both contributions and click on Accept review task. The state of the contributions changes to 'under revision'. At the same time, a mail is sent to the author to inform her about this change.
As reviewer you are responsible for the correctness of the information, for the consistency of the argumentation, for the style in content and for orthographical mistakes. You're not able to edit the texts. However, you can make suggestions to the author. Eventually, after the author has improved the contributions according to your suggestions, you can take the responsibility for the publication of the contributions with regard to these criteria. You then want to publish them. To do this, login to the forum application, select the discussion group and click Process requests. Check the contributions you want to publish and click Publish.
The selected items disappear from the list of requests to process. If you select the discussion group, you see the contributions published. At the same time, a mail is generated informing the author about the publication of her contributions.

